There are always new packages coming out, and others being
updated. If you use an automated updater like TEX Live’s
tlmgr or MiKTEX’s
Update-FNDB then updates will get
put in ‘The Right Place’ automatically, and you
don’t need to do anything else.
But there are also times when you may want to add a new or
special class or package by hand; perhaps a private one from a
company or organisation (so LATEX and
CTAN won’t know about it, and you’re not
allowed to share it); or even classes and packages you are
writing yourself.
Every users needs a place to put such files where they
won’t get mixed up with your documents or with TEX’s own
files. This is the ‘The Right Place’ to put files
mentioned in § 3.2.2 above, and it’s known as
your Personal TEX
Directory (PTD) or Personal
TEX Folder (PTF).
LATEX will automatically check this folder first for
classes and packages, so anything you put in your Personal TEX Directory will be
found before LATEX looks anywhere else.
This is why it’s important for manual updates, and for special
or private classes, packages, styles, and fonts.
The folder MUST be called
texmf (short for TEX and METAFONT),
and MUST go in your home
(login) directory on Unix &
GNU/Linux systems and Microsoft Windows
running TEX Live,
or in the user Library folder on Apple Macintosh OS X. In
MiKTEX (only) you need to tell MiKTEX Console afterwards
where you put your Personal TEX
Directory (see the procedure ‘Click the Start or Windows button …’ below).
Creating a Personal TEX Directory
Follow the instructions for your operations system
below.
- Unix and GNU/Linux
You can use either the terminal or the file
manager:
- Either
open a terminal (console) window and
type
mkdir ~/texmf
- Or
use a file-manager:
Open a file-manager window (eg
Thunar,
Nautilus,
Dolphin, etc) on
your Home directory
Right-click in an empty area of your Home
directory so the menu dialog appears
Click
Type the new folder name
texmf
Press the Enter
key
Close the file-manager
- Apple Mac OS X
You can use either the terminal or the file
manager:
- Either
open a Terminal window and type
mkdir ~/Library/texmf
- Or
use the Finder:
Open the Finder on your Home folder
Click on
Click on
and in the
Options dialog which appears, make sure
that Show Library
Folder is checked, then
close the dialog window and select Library
in the list of folders
Click
Name the new folder
texmf
Close the Finder
- Microsoft Windows
You can use either the terminal or a file
manager:
- Either
open a Command window and type
cd %USERPROFILE%
md texmf
(On older Windows systems (7/8/95/XP/ME)
use %HOME%
instead of %USERPROFILE%.)
- Or
use the File
Explorer:
Open File
Explorer (called
My Computer or
Computer on older
Windows systems)
Make sure it is showing your home
folder: this
C:\Users\your~name
on modern Windows systems (on Windows 7/8
it is
Computer\System\Users\your~name
and on older Windows it is
C:\).
Right-click in your home folder and
pick , then
type in the name
texmf (make sure it
is called texmf in
all lowercase) and press the
Enter key.
Create the TDS subfolder
structure (all systems)
At a minimum, you
SHOULD create the TEX Directory
Structure (TDS) folders and subfolders
tex/latex and
fonts/truetype or
fonts/opentype
inside your new Personal TEX
Directory because this is where you put any subsubfolders
for fonts, classes, and packages that you add, for example
texmf/tex/latex/blockchart/
texmf/tex/latex/blockchart/blockchart.sty
texmf/tex/latex/supertramp/
texmf/tex/latex/supertramp/supertramp.cls
texmf/fonts/truetype/faulmann/
texmf/fonts/truetype/FaulmannFont-JRMgj.ttf
texmf/fonts/truetype/FaulmannSmp-GO87G.ttf
texmf/fonts/opentype/dehning/
texmf/fonts/opentype/dehning/SuperTramp.otf
If you want to recreate the entire
TDS subdirectory tree, there are
instructions in § 3.2.3 above which can also
be adapted for Windows systems.
Update your FNDB (MiKTEX only)
If you use MiKTEX you
MUST now tell MiKTEX to
add this folder to its File Name
Database (FNDB). This step is compulsory: without
it, nothing will work.
Click the Start or
Windows button and run the
MiKTEX Console (maintenance options) program (it
should be shown among your recent programs).
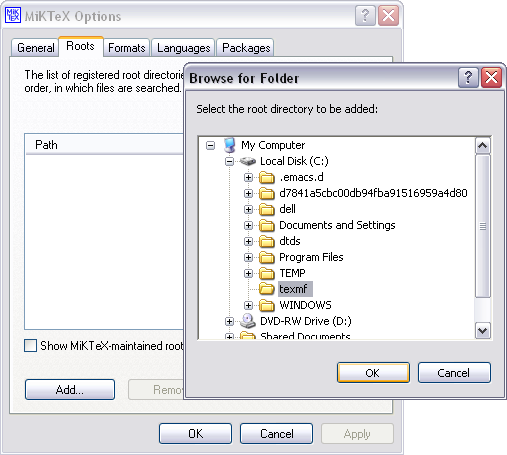
Click the Roots tab and the
Add button, and navigate in
the window to the place where you created the
texmf folder above
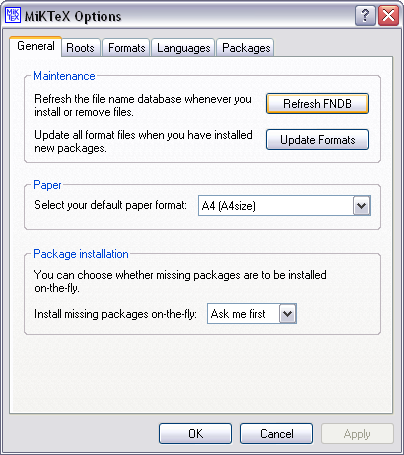
Click on the General tab
and tell MiKTEX to update its FNDB along
with its other folders by clicking the
Refresh FNDB button (the mediaobject ‘…’ below)
Warning
In MiKTEX you
MUST click on the
Refresh FNDB button any time
you make changes to the contents of your Personal TEX Directory
(the texmf folder), otherwise
MiKTEX will not be able to find the files.


